# 使用 Feign 实现声明式 REST 调用
- 设计原理
- 实现原理
- 1. Feign client 通过 OkHttpClient 完成 request 到 Response 的一次请求
- 2. okhttp 执行层
- 3. 同步请求
- 4. 连接器执行过程
- 5. Okhttp 拦截器 RetryAndFollowUpInterceptor 重试机制
- 6. Okhttp 拦截器 BridgeInterceptor 桥梁
- 7. Okhttp3 拦截器 CacheInterceptor 缓存
- 8. Okhttp3 拦截器 ConnectInterceptor 连接
- 9. Okhttp3 拦截器 CallServerInterceptor 网络调用
- 10. ConnectionPool 实现
- 最佳实践
- 常见问题
# 设计原理
Feign 的设计
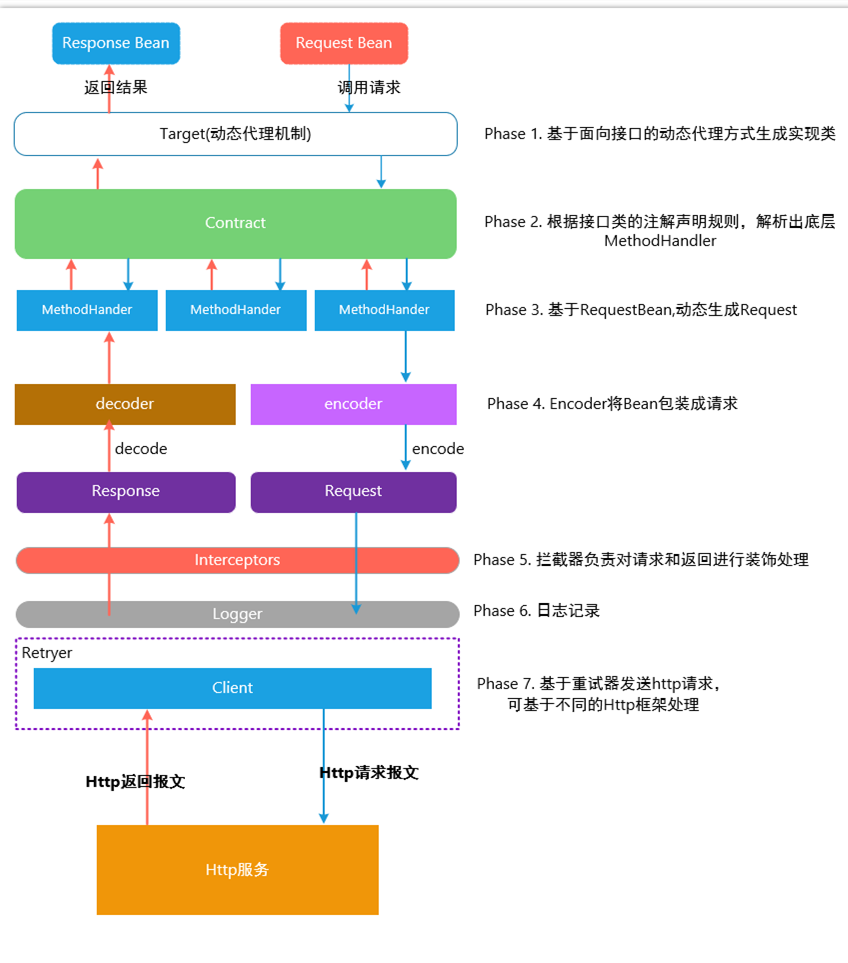
# 1. 基于面向接口的动态代理方式生成实现类
// feign.ReflectiveFeign.java
public class ReflectiveFeign extends Feign {

  //...

  /**
   * creates an api binding to the {@code target}. As this invokes reflection, care should be taken
   * to cache the result.
   */
  @SuppressWarnings("unchecked")
  @Override
  public <T> T newInstance(Target<T> target) {
    //根据接口类和Contract协议解析方式,解析接口类上的方法和注解,转换成内部的MethodHandler处理方式
    Map<String, MethodHandler> nameToHandler = targetToHandlersByName.apply(target);
    Map<Method, MethodHandler> methodToHandler = new LinkedHashMap<Method, MethodHandler>();
    List<DefaultMethodHandler> defaultMethodHandlers = new LinkedList<DefaultMethodHandler>();

    //...

    InvocationHandler handler = factory.create(target, methodToHandler);
    // 基于Proxy.newProxyInstance 为接口类创建动态实现,将所有的请求转换给InvocationHandler处理
    T proxy = (T) Proxy.newProxyInstance(target.type().getClassLoader(),
        new Class<?>[] {target.type()}, handler);

    for (DefaultMethodHandler defaultMethodHandler : defaultMethodHandlers) {
      defaultMethodHandler.bindTo(proxy);
    }
    return proxy;
  }

  //...
}
2
3
4
5
6
7
8
9
10
11
12
13
14
15
16
17
18
19
20
21
22
23
24
25
26
27
28
29
30
31
32
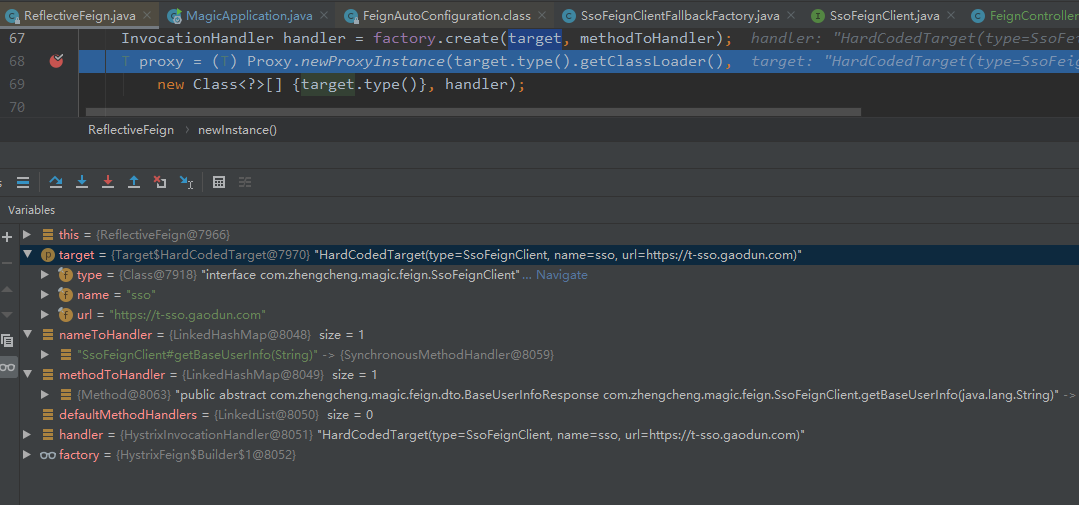
项目启动时的效果如下:
# 2. 根据Contract协议规则,解析接口类的注解信息
// feign.Contract.java
/**
 * Defines what annotations and values are valid on interfaces.
 */
public interface Contract {

  /**
   * Called to parse the methods in the class that are linked to HTTP requests.
   *
   * @param targetType {@link feign.Target#type() type} of the Feign interface.
   */
  // TODO: break this and correct spelling at some point
  List<MethodMetadata> parseAndValidatateMetadata(Class<?> targetType);

  //...
}
2
3
4
5
6
7
8
9
10
11
12
13
14
15
16
项目启动时的效果如下:
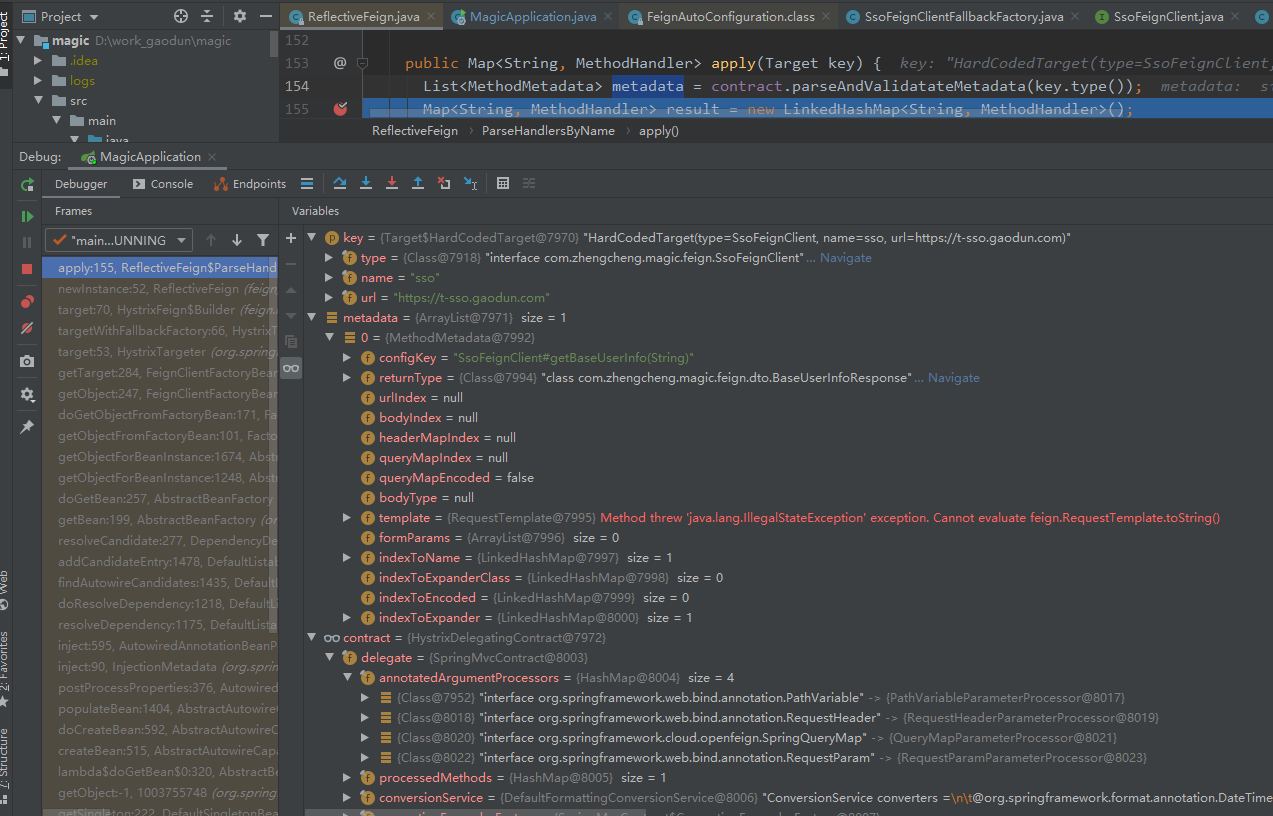
Feign 默认的协议规范: 官方文档 (opens new window) 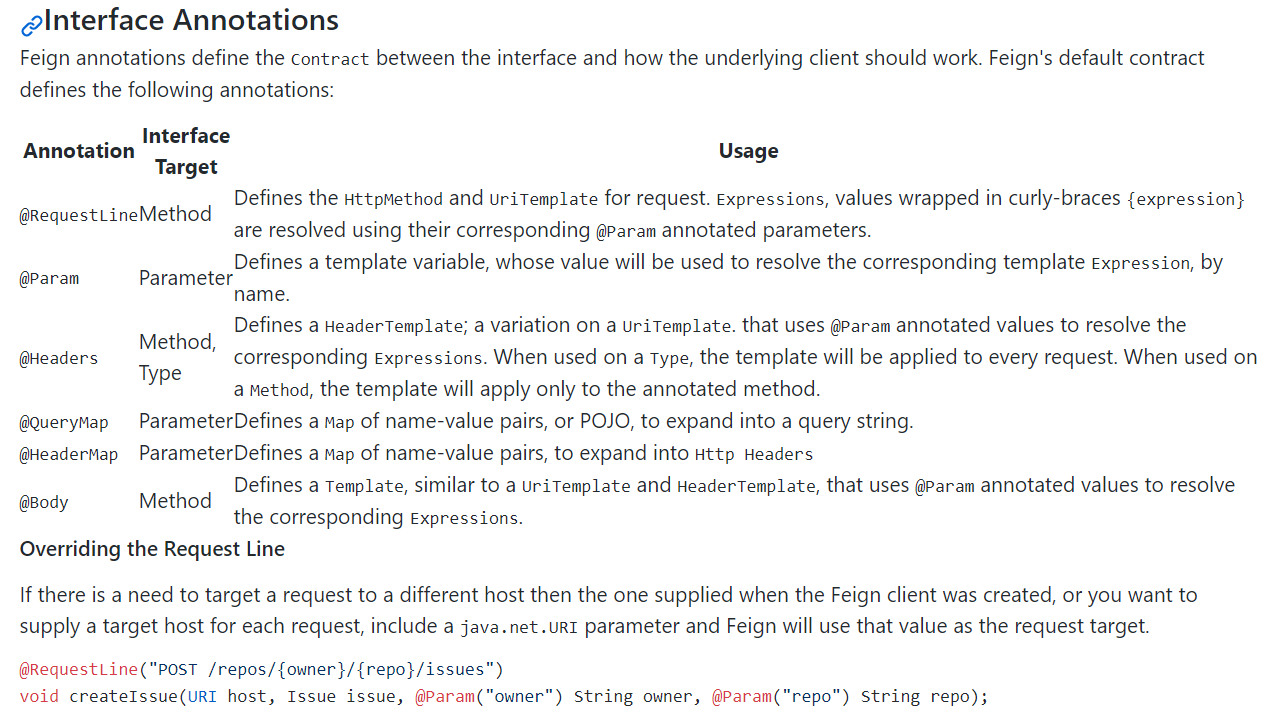
在Spring Boot(Cloud)中,Feign 默认使用的契约是 SpringMvcContract, 因此它可以使用 SpringMvc 的注解。
如果让它使用 Feign 自带的注解进行工作,需要自定义 Feign 的配置:
/**
 * 该类为Feign的配置类
 * <p>
 * 注意:该类可以不写 @Configuration 注解;如果加了 @Configuration 注解,那么该类不能放在主应用程序上下文 @ComponentScan 所扫描的包中,否则会使项目中默认的 Feign 配置类发生变化
 *
 * @author :    zhangquansheng
 * @date :    2020/7/9 18:40
 */
public class FeignConfiguration {

    /**
     * 将契约改为feign原生的默认契约。这样就可以使用feign自带的注解了。
     *
     * @return 默认的feign契约
     */
    @Bean
    public Contract feignContract() {
        return new feign.Contract.Default();
    }
}
2
3
4
5
6
7
8
9
10
11
12
13
14
15
16
17
18
19
20
# 3. 基于 RequestBean,动态生成 Request
feign.ReflectiveFeign.BuildTemplateByResolvingArgs 实现了RequestTemplate.Factory,通过以上动态代理生成的MethodHandler 和 Object[] argv 生成 RequestTemplate , 源码如下:
// feign.ReflectiveFeign.BuildTemplateByResolvingArgs.java
 //...
    @Override
    public RequestTemplate create(Object[] argv) {
      RequestTemplate mutable = RequestTemplate.from(metadata.template());
      // ...
      return template;
    }
 //...
2
3
4
5
6
7
8
9
然后 RequestTemplate 根据targetRequest方法转换成真正的Request请求, 源码如下:
// feign.SynchronousMethodHandler.java
//...

  Request targetRequest(RequestTemplate template) {
    for (RequestInterceptor interceptor : requestInterceptors) {
      interceptor.apply(template);
    }
    return target.apply(template);
  }

//...
2
3
4
5
6
7
8
9
10
11
# 4. 使用Encoder 将Bean转换成 Http报文正文(消息解析和转码逻辑)
// feign.SynchronousMethodHandler

Object executeAndDecode(RequestTemplate template, Options options) throws Throwable {
    //...
        response = client.execute(request, options);
    //...
}
2
3
4
5
6
7
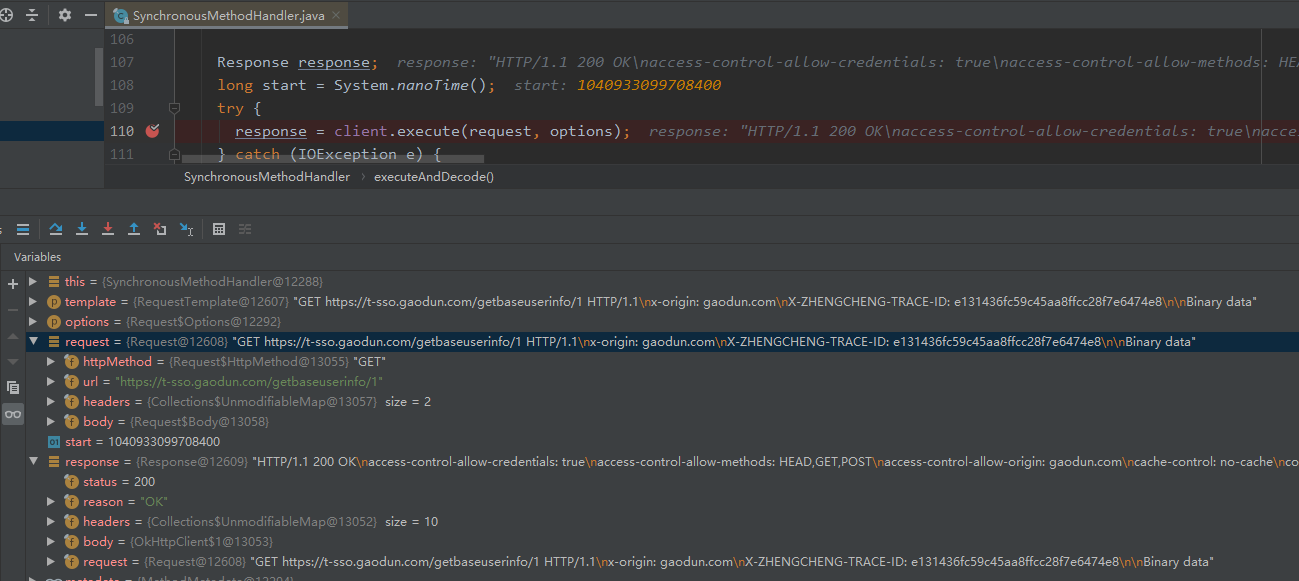
程序运行时数据结构如下:
# 5. 拦截器负责对请求和返回进行装饰处理
在请求转换的过程中,Feign 抽象出来了拦截器接口,用于用户自定义对请求的操作:
// feign.RequestInterceptor.java

public interface RequestInterceptor {

  /**
   * 可以在构造RequestTemplate 请求时,增加或者修改Header, Method, Body 等信息
   * Called for every request. Add data using methods on the supplied {@link RequestTemplate}.
   */
  void apply(RequestTemplate template);
}
2
3
4
5
6
7
8
9
10
# 6. 日志记录
在发送和接收请求的时候,Feign定义了统一的日志门面来输出日志信息 , 并且将日志的输出定义了四个等级:
| 级别 | 说明 |
|---|---|
| NONE | 不做任何记录 |
| BASIC | 只记录输出Http 方法名称、请求URL、返回状态码和执行时间 |
| HEADERS | 记录输出Http 方法名称、请求URL、返回状态码和执行时间 和 Header 信息 |
| FULL | 记录Request 和Response的Header,Body和一些请求元数据 |
特别提示
日志规范中,对于外部接口部分的要求是:调用第三方时的调用参数和调用结果要打印Info级别的日志,由于Feign配置FULL级别的情况下,需要配置Debug级别才能打印所需要的日志。
在最佳实践中,配置修改了Feign的日志输出为INFO级别。
# 7. 基于重试器发送HTTP请求
Feign 内置了一个重试器,当HTTP请求出现IO异常时,Feign会有一个最大尝试次数发送请求
重试器有如下几个控制参数:
| 重试参数 | 说明 | 默认值 |
|---|---|---|
| period | 初始重试时间间隔,当请求失败后,重试器将会暂停 初始时间间隔(线程 sleep 的方式)后再开始,避免强刷请求,浪费性能 | 100ms |
| maxPeriod | 当请求连续失败时,重试的时间间隔将按照:long interval = (long) (period * Math.pow(1.5, attempt - 1)); 计算,按照等比例方式延长,但是最大间隔时间为 maxPeriod, 设置此值能够避免 重试次数过多的情况下执行周期太长 | 1000ms |
| maxAttempts | 最大重试次数 | 5 |
使用微服务(Spring Cloud)一般情况下,都是 ribbon 的超时时间(<)hystrix的超时时间(因为涉及到ribbon的重试机制)因为ribbon的重试机制和Feign的重试机制有冲突,所以源码中默认关闭Feign的重试机制
# 实现原理
# 1. Feign client 通过 OkHttpClient 完成 request 到 Response 的一次请求
使用 feign.okhttp.OkHttpClient (注意和okhttp3.OkHttpClient是不一样的),
实际上处理 HTTP URL 请求的是 feignClient(…) 方法中的 feign.okhttp.OkHttpClient.execute(…) 方法,源码如下:
//feign.okhttp.OkHttpClient.java

  @Override
  public feign.Response execute(feign.Request input, feign.Request.Options options)
      throws IOException {
    okhttp3.OkHttpClient requestScoped;
    if (delegate.connectTimeoutMillis() != options.connectTimeoutMillis()
        || delegate.readTimeoutMillis() != options.readTimeoutMillis()) {
      requestScoped = delegate.newBuilder()
          .connectTimeout(options.connectTimeoutMillis(), TimeUnit.MILLISECONDS)
          .readTimeout(options.readTimeoutMillis(), TimeUnit.MILLISECONDS)
          .followRedirects(options.isFollowRedirects())
          .build();
    } else {
      requestScoped = delegate;
    }
    Request request = toOkHttpRequest(input);
    // okhttp 执行层, 其中requestScoped 是 okhttp3.OkHttpClient 的实例
    Response response = requestScoped.newCall(request).execute();
    return toFeignResponse(response, input).toBuilder().request(input).build();
  }
2
3
4
5
6
7
8
9
10
11
12
13
14
15
16
17
18
19
20
21
在默认没有配置的情况下,Options的初始化参数如下:
public Options() {
  this(10 * 1000, 60 * 1000);
}
// connectTimeoutMillis = 10_000
// readTimeoutMillis = 60_000
2
3
4
5
也可以通过配置文件来修改默认配置,配置如下:
// default 为默认的,也可以根据feign的value值,单独配置
feign.client.config.default.connectTimeout=1000
feign.client.config.default.readTimeout=10000
2
3
从源码可以看到,feign使用okhttp时,超时时间优先根据client的时间来设置。
# 2. okhttp 执行层
// 其中requestScoped 是 okhttp3.OkHttpClient 的实例
Response response = requestScoped.newCall(request).execute();
2
这是应用程序中发起网络请求最顶端的调用,newCall(request) 方法返回 RealCall 对象。
RealCall 封装了一个 request 代表一个请求调用任务,RealCall 有两个重要的方法 execute() 和 enqueue(Callback responseCallback)。
execute() 是直接在当前线程执行请求,enqueue(Callback responseCallback) 是将当前任务加到任务队列中,执行异步请求。
# 3. 同步请求
// okhttp3.RealCall.java

  @Override public Response execute() throws IOException {
    synchronized (this) {
      if (executed) throw new IllegalStateException("Already Executed");
      executed = true;
    }
    captureCallStackTrace();
    try {
      client.dispatcher().executed(this);
      Response result = getResponseWithInterceptorChain();
      if (result == null) throw new IOException("Canceled");
      return result;
    } finally {
      client.dispatcher().finished(this);
    }
  }
2
3
4
5
6
7
8
9
10
11
12
13
14
15
16
17
从执行层说到连接层,涉及到 getResponseWithInterceptorChain 方法中组织的各个拦截器的执行过程,其中 getResponseWithInterceptorChain 是关键,它使用了责任链设计模式
# 4. 连接器执行过程
// okhttp3.RealCall.java

  Response getResponseWithInterceptorChain() throws IOException {
    // Build a full stack of interceptors.
    List<Interceptor> interceptors = new ArrayList<>();
    interceptors.addAll(client.interceptors());
    interceptors.add(retryAndFollowUpInterceptor);
    interceptors.add(new BridgeInterceptor(client.cookieJar()));
    interceptors.add(new CacheInterceptor(client.internalCache()));
    interceptors.add(new ConnectInterceptor(client));
    if (!forWebSocket) {
      interceptors.addAll(client.networkInterceptors());
    }
    interceptors.add(new CallServerInterceptor(forWebSocket));

    Interceptor.Chain chain = new RealInterceptorChain(
        interceptors, null, null, null, 0, originalRequest);
    return chain.proceed(originalRequest);
  }
2
3
4
5
6
7
8
9
10
11
12
13
14
15
16
17
18
19
# 5. Okhttp 拦截器 RetryAndFollowUpInterceptor 重试机制
此拦截器将从故障中恢复,并根据需要执行重定向。如果调用被取消,它会抛出 *{@link IOException}
关于重定向次数:
/**
 * How many redirects and auth challenges should we attempt? Chrome follows 21 redirects; Firefox,
 * curl, and wget follow 20; Safari follows 16; and HTTP/1.0 recommends 5.
 */
private static final int MAX_FOLLOW_UPS = 20;
2
3
4
5
# 6. Okhttp 拦截器 BridgeInterceptor 桥梁
一个实现应用层和网络层直接的数据格式编码的桥。
- 第一: 把应用层客户端传过来的请求对象转换为 Http 网络协议所需字段的请求对象。
- 第二: 把下游网络请求结果转换为应用层客户所需要的响应对象
默认设置HTTP长连接(开启Keep-Alive功能可使客户端到服务器端的连接持续有效,当出现对服务器的后继请求时,Keep-Alive功能避免了建立或者重新建立连接。)
if (userRequest.header("Connection") == null) {
  requestBuilder.header("Connection", "Keep-Alive");
}
2
3
# 7. Okhttp3 拦截器 CacheInterceptor 缓存
为来自缓存的请求提供服务,并将响应写入缓存
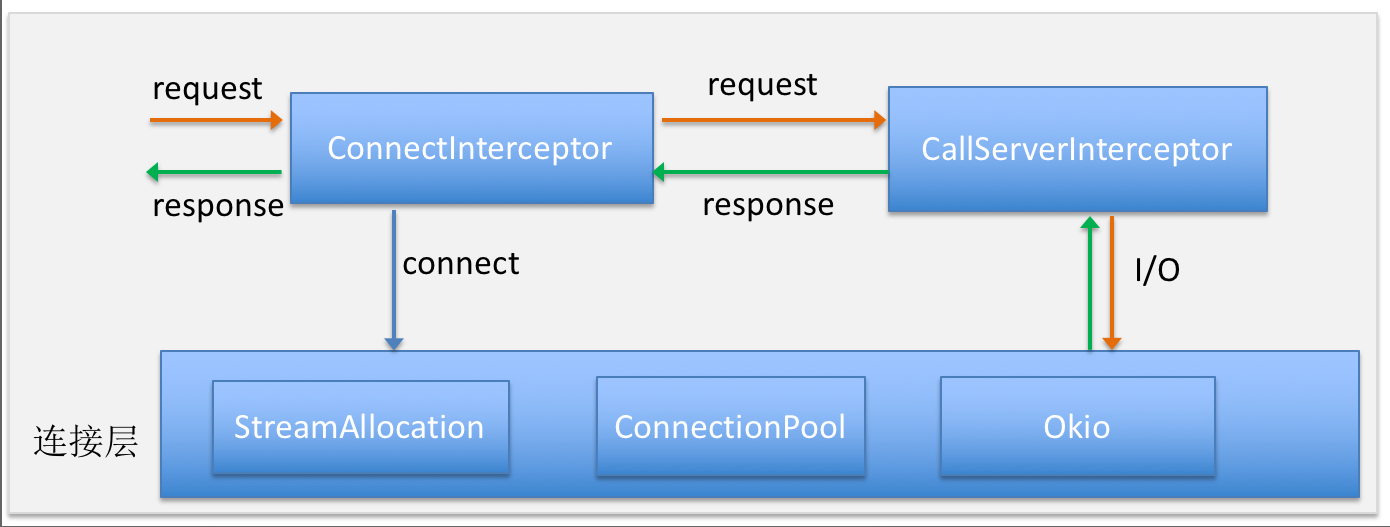
# 8. Okhttp3 拦截器 ConnectInterceptor 连接
打开到目标服务器的连接并继续到下一个拦截器。
# 9. Okhttp3 拦截器 CallServerInterceptor 网络调用
这是链中的最后一个拦截器。它对服务器进行网络调用。
# 10. ConnectionPool 实现
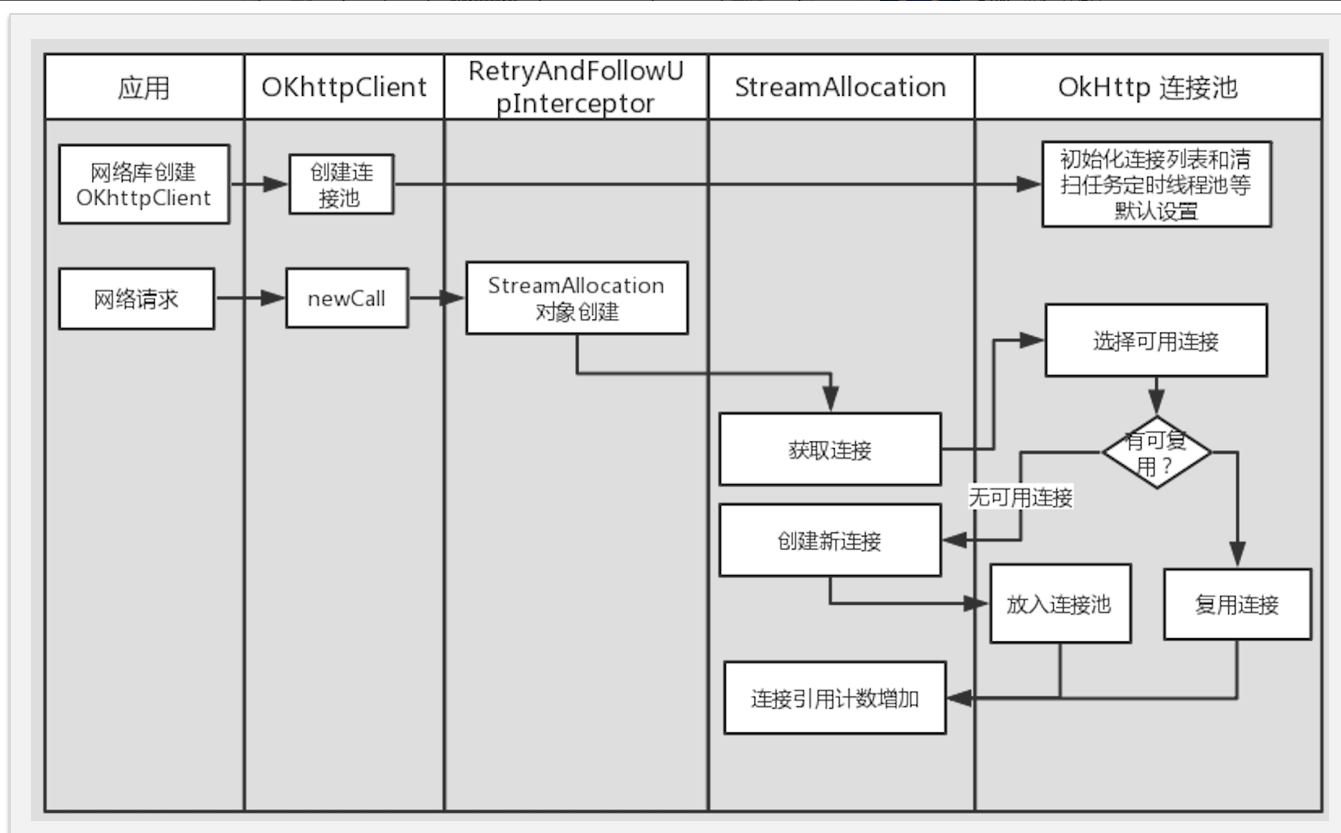
管理HTTP和HTTP/2连接的重用以减少网络延迟 HTTP请求共享同一{@link Address} ,共享同一{@link Connection} 实现策略为将来使用而保持开放的连接。
默认实现中,使用一个双向队列来缓存所有连接, 这些连接中最多只能存在 5 个空闲连接,空闲连接最多只能存活 5 分钟。
/**
 * Create a new connection pool with tuning parameters appropriate for a single-user application.
 * The tuning parameters in this pool are subject to change in future OkHttp releases. Currently
 * this pool holds up to 5 idle connections which will be evicted after 5 minutes of inactivity.
 */
public ConnectionPool() {
  this(5, 5, TimeUnit.MINUTES);
}
2
3
4
5
6
7
8
如何复用Connection:遍历了所有的连接,然后判断某个连接是否可以复用;http1.x协议下当前socket没有其他流正在读写时可以复用,否则不行,http2.0对流数量没有限制。
如何清理连接池:每次put一个新连接的时候都会判断是否需要清理。遍历当前所有连接,跳过正在使用的连接,其他没有用的连接,如果哪个连接超过了规定的时间,就关掉这个socket。如果都没有超过规定时间的,就返回离规定时间最近的那个差值。拿到那个时间值后,我们再回到上面那个cleanupRunnable中,在那里会wait线程,然后醒来继续清理
# 最佳实践
# 整合 Feign
- 添加依赖
    <dependency>
        <groupId>org.springframework.cloud</groupId>
        <artifactId>spring-cloud-starter-openfeign</artifactId>
    </dependency>
2
3
4
- 启用Feign
启用类上添加注解@EnableFeignClients客户端允许开启使用Feign调用,扫描@FeignClient标注的FeignClient接口
@SpringBootApplication
@EnableFeignClients
public class FeignApplication {
    public static void main(String[] args) {
        SpringApplication.run(FeignApplication.class,args);
    }
}
2
3
4
5
6
7
- 创建一个Feign接口,并添加
@FeignClient注解。
@FeignClient(name = "sso", url = "https://t-sso.gaodun.com", fallbackFactory = SsoFeignClientFallbackFactory.class)
public interface SsoFeignClient {
    /**
     * 学生 ID 获取用户信息
     *
     * @param userId 学生 ID
     * @return 用户信息
     */
    @GetMapping(value = "/getbaseuserinfo/{userid}", headers = {"x-origin=gaodun.com"})
    BaseUserInfoResponse getBaseUserInfo(@PathVariable("userid") String userId);
}
2
3
4
5
6
7
8
9
10
11
# 自定义Feign配置
Feign 支持使用属性自定义,这种方式比使用Java代码配置的方式更加方便。
- 配置指定名称的Feign Client
feign:
  client:
    config:
      sso:
        # 相当于Request.Options
        connectTimeout: 5000
        # 相当于Request.Options
        readTimeout: 5000
        # 配置Feign的日志级别,相当于代码配置方式中的Logger
        loggerLevel: FULL
        # Feign 的错误解码器,相当于代码配置方式中的ErrorDecoder
        errorDecoder: com.example.SimpleErrorDecoder
        # 配置重试,相当于代码配置方式中的Retryer
        retryer: com.example.SimpleRetryer
        # 配置拦截器,相当于代码配置方式中的RequestInterceptor
        requestInterceptors:
         - com.example.FooRequestInterceptor
         - com.example.BarRequestInterceptor
        decode404: false
2
3
4
5
6
7
8
9
10
11
12
13
14
15
16
17
18
19
- 通用配置
如果想配置所有的Feign Client,只需要做如下配置即可:
feign:
  client:
    config:
      default:
        connectTimeout: 5000
        readTimeout: 5000
2
3
4
5
6
温馨提示
属性配置的方式比Java代码配置的方式优先级更高,如果你想让Java代码配置方式优先级更高,可使用这个属性:feign.client.default-to-properties=false。
# 使用Feign构造多参数请求
以GET已经POST方法请求为例,其他的方法(例如DELETE、PUT等)的请求原理相同。
- GET 请求多参数的 URL
    @GetMapping(value = "/get")
    User get(@RequestParam("id") Long id,@RequestParam("username") String username);
2
- POST 请求包含多个参数
    @PostMapping(value = "/post")
    User post(@RequestBody User user);
2
- POST
Content-Type=application/x-www-form-urlencoded提交表单
    @PostMapping(value = "/post", consumes = MediaType.APPLICATION_FORM_URLENCODED_VALUE)
    void post(MultiValueMap<String, Object> formData);
2
注意
application/x-www-form-urlencoded 提交表单的方式下,不能使用@RequestBody,否则会异常:feign.codec.EncodeException: Could not write request: no suitable HttpMessageConverter found for
# 使用Feign上传文件
在实际应用中,我们可能会使用 Feign上传文件,Feign 官方提供了子项目 feign-form (opens new window), 其中实现了上传所需的 Encoder。下面是使用 Feign上传文件的主要步骤:
- 为应用添加 feign-form 相关依赖
<dependencies>
  <dependency>
    <groupId>io.github.openfeign.form</groupId>
    <artifactId>feign-form</artifactId>
    <version>3.8.0</version>
  </dependency>
  <dependency>
    <groupId>io.github.openfeign.form</groupId>
    <artifactId>feign-form-spring</artifactId>
    <version>3.8.0</version>
  </dependency>
</dependencies>
2
3
4
5
6
7
8
9
10
11
12
- 可以将表单编码器与Spring MultipartFile和@FeignClient一起使用
@FeignClient(
    name = "file-upload-service",
    configuration = FileUploadServiceClient.MultipartSupportConfig.class
)
public interface FileUploadServiceClient extends IFileUploadServiceClient {

  @RequestMapping(value = "/upload", consumes = MULTIPART_FORM_DATA_VALUE)
  String upload(@RequestBody MultipartFile file);

  public class MultipartSupportConfig {
    @Autowired
    private ObjectFactory<HttpMessageConverters> messageConverters;
    @Bean
    public Encoder feignFormEncoder () {
      return new SpringFormEncoder(new SpringEncoder(messageConverters));
    }
  }
}
2
3
4
5
6
7
8
9
10
11
12
13
14
15
16
17
18
# Feign 对继承的支持
Feign支持继承。使用继承,可将一些公共操作分组到一些父接口中,从而简化Feign的开发。
UserService.java
public interface UserService {

    @RequestMapping(method = RequestMethod.GET, value ="/users/{id}")
    User getUser(@PathVariable("id") long id);
}
2
3
4
5
UserResource.java
@RestController
public class UserResource implements UserService {

}
2
3
4
UserClient.java
package project.user;

@FeignClient("users")
public interface UserClient extends UserService {

}
2
3
4
5
6
注意
尽管Feign的继承可帮助我们进一步简化开发,但是Spring Cloud指出——通常情况下,不建议服务器端和客户端之间共享接口,因为这种方式会造成服务器端和客户端代码的紧耦合。 并且,Feign本身并不使用Spring MVC的工作机制(方法参数映射不被继承)。
应客观看待“紧耦性”与“方便性”,并在权衡利弊后作出取舍,个人推荐内部接口服务可使用继承的方式提供一个feign的客户端,这样会大大方便内部接口的对接。
# Feign 对压缩的支持
在一些场景下,可能需要对请求或响应进行压缩,此时可使用启用Feign的压缩功能。
feign.compression.request.enabled=true
feign.compression.response.enabled=true
2
对于请求的压缩,Feign还提供了更为详细的设置,例如:
feign.compression.request.enabled=true
feign.compression.request.mime-types=text/xml,application/xml,application/json
feign.compression.request.min-request-size=2048
2
3
其中,feign.compression.request.mime-types 用于支持的媒体类型列表,默认是 text/xml,application/xml,application/json feign.compression.request.min-request-size 用于设置请求的最小阈值,默认是2048
# Feign 的日志
Feign对日志的处理非常灵活,可为每个Feign客户端指定日志记录策略,每个Feign客户端都会创建一个logger。 默认情况下,logger的名称是Feign接口的完整类名。需要注意的是,Feign的日志打印只会对DEBUG级别作出响应。 我们可为每个Feign客户端配置各自的Logger.Level对象,告诉Feign记录那些日志。
Logger.Level的值有以下选择:
- NONE:不记录任何日志(默认值)
- BASIC:仅记录请求方法、URL、响应状态代码以及执行时间
- HEADERS:记录BASIC级别的基础上,记录请求和响应的header
- FULL:记录请求和响应的header,body和元数据
下面为前面编写的SsoFeignClient添加日志打印,将它的日志级别设置为FULL。
- 编写Feign配置类:
@Configuration
public class FeignLogConfiguration {
    @Bean
    Logger.Level feignLoggerLevel() {
        return Logger.Level.FULL;
    }
}
2
3
4
5
6
7
- 修改 Feign 的接口,指定配置类:
@FeignClient(name = "sso", url = "https://t-sso.gaodun.com", fallbackFactory = SsoFeignClientFallbackFactory.class, configuration = FeignLogConfiguration.class)
public interface SsoFeignClient {
    /**
     * 学生 ID 获取用户信息
     *
     * @param userId 学生 ID
     * @return 用户信息
     */
    @GetMapping(value = "/getbaseuserinfo/{userid}", headers = {"x-origin=gaodun.com"})
    BaseUserInfoResponse getBaseUserInfo(@PathVariable("userid") String userId);
}
2
3
4
5
6
7
8
9
10
11
- 在
application.yml中添加一下内容,指定Feign接口的日志级别为DEBUG:
logging:
  level:
    com.zhengcheng.magic.feign.SsoFeignClient: DEBUG # 将Feign接口的日志级别设置为DEBUG,因为Feign的Logger.Level只对DEBUG作出响应
2
3
# 日志自定义扩展
与外部HTTP接口交互时需要记录一些请求和响应日志来排查问题,虽然Feign支持但它的日志是Debug级别,并不符合我们在生产中使用INFO级别日志要求。
- 实现FeignLoggerFactory工厂接口,InfoFeignLoggerFactory 是FeignConfig静态内部类
public class InfoFeignLoggerFactory implements FeignLoggerFactory {
    @Override
    public Logger create(Class<?> type) {
        return new InfoFeignLogger(LoggerFactory.getLogger(type));
    }
}
2
3
4
5
6
- 继承feign.Logger实现info级别日志输出,InfoFeignLogger使用slf4j日志工具
public class InfoFeignLogger extends feign.Logger {

    // 建议使用slf4j这样项目在更换日志框架也不用修改源代码了,扩展性更强
    private final org.slf4j.Logger logger;

    public InfoFeignLogger(org.slf4j.Logger logger) {
        this.logger = logger;
    }

    @Override
    protected void log(String configKey, String format, Object... args) {
        if (logger.isInfoEnabled()) {
            logger.info(String.format(methodTag(configKey) + format, args));
        }
    }
}
2
3
4
5
6
7
8
9
10
11
12
13
14
15
16
- 日志工厂InfoFeignLoggerFactory注册到spring 容器中
@Slf4j
@Configuration
@ConditionalOnClass({Feign.class})
@AutoConfigureBefore(FeignAutoConfiguration.class)
public class FeignOkHttpConfig {
  //...
    /**
     * Feign 日志级别
     */
    @Bean
    Logger.Level feignLoggerLevel() {
        return Logger.Level.FULL;
    }

    @Bean
    FeignLoggerFactory infoFeignLoggerFactory() {
        return new InfoFeignLoggerFactory();
    }
//...
}
2
3
4
5
6
7
8
9
10
11
12
13
14
15
16
17
18
19
20
# 常见问题
# 同时配置 Feign 和 Ribbon 的超时时间的优先级
// LoadBalancerFeignClient.java
  IClientConfig getClientConfig(Request.Options options, String clientName) {
        Object requestConfig;
        if (options == DEFAULT_OPTIONS) {
            requestConfig = this.clientFactory.getClientConfig(clientName);
        } else {
            requestConfig = new FeignOptionsClientConfig(options);
        }

        return (IClientConfig)requestConfig;
    }
2
3
4
5
6
7
8
9
10
11
# feign 启用Hystrix,Hystrix线程池隔离支持日志链路跟踪
public class MdcHystrixConcurrencyStrategy extends HystrixConcurrencyStrategy {

    @Override
    public <T> Callable<T> wrapCallable(Callable<T> callable) {
        return new MdcAwareCallable(callable, MDC.getCopyOfContextMap());
    }

    private class MdcAwareCallable<T> implements Callable<T> {

        private final Callable<T> delegate;

        private final Map<String, String> contextMap;

        public MdcAwareCallable(Callable<T> callable, Map<String, String> contextMap) {
            this.delegate = callable;
            this.contextMap = contextMap != null ? contextMap : new HashMap<>();
        }

        @Override
        public T call() throws Exception {
            try {
                MDC.setContextMap(contextMap);
                return delegate.call();
            } finally {
                MDC.clear();
            }
        }
    }
}
2
3
4
5
6
7
8
9
10
11
12
13
14
15
16
17
18
19
20
21
22
23
24
25
26
27
28
29
@Slf4j
@Configuration
@ConditionalOnClass({Feign.class})
@AutoConfigureBefore(FeignAutoConfiguration.class)
public class FeignOkHttpConfig {

    //...
    public FeignOkHttpConfig() {
        try {
            HystrixConcurrencyStrategy mdcTarget = new MdcHystrixConcurrencyStrategy();
            HystrixConcurrencyStrategy strategy = HystrixPlugins.getInstance().getConcurrencyStrategy();
            if (strategy instanceof MdcHystrixConcurrencyStrategy) {
                return;
            }
            HystrixCommandExecutionHook commandExecutionHook = HystrixPlugins
                    .getInstance().getCommandExecutionHook();
            HystrixEventNotifier eventNotifier = HystrixPlugins.getInstance()
                    .getEventNotifier();
            HystrixMetricsPublisher metricsPublisher = HystrixPlugins.getInstance()
                    .getMetricsPublisher();
            HystrixPropertiesStrategy propertiesStrategy = HystrixPlugins.getInstance()
                    .getPropertiesStrategy();

            HystrixPlugins.reset();
            HystrixPlugins.getInstance().registerConcurrencyStrategy(mdcTarget);
            HystrixPlugins.getInstance()
                    .registerCommandExecutionHook(commandExecutionHook);
            HystrixPlugins.getInstance().registerEventNotifier(eventNotifier);
            HystrixPlugins.getInstance().registerMetricsPublisher(metricsPublisher);
            HystrixPlugins.getInstance().registerPropertiesStrategy(propertiesStrategy);
        } catch (Exception e) {
            log.error("Failed to register Hystrix Concurrency Strategy", e);
        }
    }
}
2
3
4
5
6
7
8
9
10
11
12
13
14
15
16
17
18
19
20
21
22
23
24
25
26
27
28
29
30
31
32
33
34
35
# Feign 使用OkHttp3
在Feign中使用OkHttp作为网络请求框架,配置如下:
feign.httpclient.enabled = false
feign.okhttp.enabled = true
feign.hystrix.enabled = true
2
3
# Spring Cloud 之 Feign、Ribbon 设置超时时间
Spring Cloud 下使用Feign调用接口分两层,Ribbon的调用和Hystrix的调用,超时时间配置如下:
hystrix.command.default.execution.timeout.enabled = true
hystrix.command.default.execution.isolation.thread.timeoutInMilliseconds = 10000

ribbon.read-timeout = 5000
ribbon.connect-timeout = 5000
2
3
4
5
一般情况下 都是Ribbon的超时时间(<)Hystrix的超时时间(涉及到Ribbon的重试机制,且因为Ribbon的重试机制和Feign的重试机制有冲突,所以源码中默认关闭Feign的重试机制。)。
如果不配置Ribbon的重试次数,默认会重试一次。并且GET方式请求无论是连接异常还是读取异常,都会进行重试。非GET方式请求,只有连接异常时,才会进行重试。
# Feign 长连接导致的异常
当使用 Feign 使用OkHttp3,默认配置如下:
// org.springframework.cloud.openfeign.FeignAutoConfiguration.java
//...
	@Bean
    @ConditionalOnMissingBean(ConnectionPool.class)
    public ConnectionPool httpClientConnectionPool(FeignHttpClientProperties httpClientProperties,
                                                   OkHttpClientConnectionPoolFactory connectionPoolFactory) {
        Integer maxTotalConnections = httpClientProperties.getMaxConnections();
        Long timeToLive = httpClientProperties.getTimeToLive();
        TimeUnit ttlUnit = httpClientProperties.getTimeToLiveUnit();
        return connectionPoolFactory.create(maxTotalConnections, timeToLive, ttlUnit);
    }
//...
2
3
4
5
6
7
8
9
10
11
12
Http1.1 协议下 Connection:keep-Alive 的时长为900秒(15分钟),这样容易出现java.io.IOException : unexpected end of steam on错误,解决方式如下:
//...
    @Value("${feign.okhttp3.connect-timeout.milliseconds}")
    private Long connectTimeout;
    @Value("${feign.okhttp3.read-timeout.milliseconds}")
    private Long readTimeout;
    @Value("${feign.okhttp3.write-timeout.milliseconds}")
    private Long writeTimeout;

    @Bean
    public okhttp3.OkHttpClient okHttpClient() {
        return new okhttp3.OkHttpClient.Builder()
                .connectTimeout(connectTimeout, TimeUnit.MILLISECONDS)
                .readTimeout(readTimeout, TimeUnit.MILLISECONDS)
                .writeTimeout(writeTimeout, TimeUnit.MILLISECONDS)
                .connectionPool(new okhttp3.ConnectionPool())
                .build();
    }
//...
2
3
4
5
6
7
8
9
10
11
12
13
14
15
16
17
18
使用 okhttp3.ConnectionPool即可(不推荐直接关闭 Connection:close,开启Keep-Alive功能可使客户端到服务器端的连接持续有效,当出现对服务器的后继请求时,Keep-Alive功能避免了建立或者重新建立连接。)
# hystrix线程池如何合理配置
下面就是我们线上大量系统优化后的生产经验总结:
假设你的服务A,每秒钟会接收30个请求,同时会向服务B发起30个请求,然后每个请求的响应时长经验值大概在200ms,那么你的hystrix线程池需要多少个线程呢?
计算公式是:30(每秒请求数量) * 0.2(每个请求的处理秒数) + 4(给点缓冲buffer) = 10(线程数量)
必须设置合理的参数,避免高峰期,频繁的hystrix线程卡死
如果hystix超时时间设置为500ms,那么1s中可以处理2个线程,所以如果需要让一个服务器达到100的并发,那么核心线程数需要配置到50才能达到处理每秒100的请求;
参考配置如下:
hystrix:
  command:
    default:
      execution:
        isolation:
          thread:
            timeoutInMilliseconds: 10000
    sso:
      execution:
        isolation:
          thread:
            timeoutInMilliseconds: 3000
  threadpool:
    default:
      coreSize: 100
      maxQueueSize: 1000
    sso:
      coreSize: 10
      maxQueueSize: 100
2
3
4
5
6
7
8
9
10
11
12
13
14
15
16
17
18
19
# 何时会出现 Hystrix circuit short-circuited and is OPEN
首先,Hystrix 的隔离策略有两种:分别是线程隔离和信号量隔离
- 线程池隔离: 使用该方式,HystrixCommand 将在单独的线程上执行,并发请求受到线程池中的线程数量的限制。
- 信号量隔离:使用该方式,HystrixCommand 将在调用线程上执行,开销相对较小,并发请求受到信号量个数的限制。
Hystrix 中默认并且推荐使用线程隔离,因为这种方式有一个除网络超时以外的额外保护层。
那么在默认的情况(线程隔离)下,何种情况下回出现Hystrix circuit short-circuited and is OPEN?
- 当配置的
hystrix.threadpool.default.coreSize、hystrix.threadpool.default.maxQueueSize的大小(如果不配置,默认都是10)不满足接口并发的请求的情况下; - 服务提供者不可用,是否开启熔断器主要由依赖调用的错误比率决定的,依赖调用的错误比率=请求失败数/请求总数(默认50%)。还有一个参数,用于设置在一个滚动窗口中,打开断路器的最少请求数(默认20)。
# 当在配置时间窗口内达到此数量的失败后,进行短路。默认20个
hystrix.command.default.circuitBreaker.requestVolumeThreshold = 20
# 短路多久以后开始尝试是否恢复,默认5s
hystrix.command.default.circuitBreaker.sleepWindowInMilliseconds = 5000
# 出错百分比阈值,当达到此阈值后,开始短路。默认50%
hystrix.command.default.circuitBreaker.errorThresholdPercentage = 50
2
3
4
5
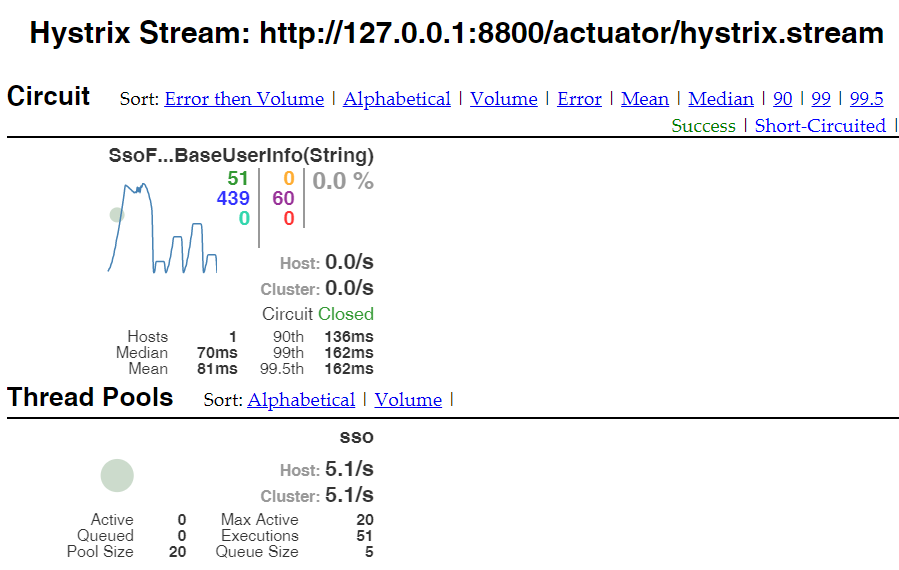
6
下面通过使用 Hystrix Dashboard 可视化监控数据来体验一下效果:
